GatsbyJS (React製の静的サイトジェネレータ) がまだまだ流行っているので、Scully (Angular 製のそれ) を軽く試してみる(笑)
セットアップ
この記事の執筆現在 (2022/02/27)、Scully は Angular v12 に対応しているようなので、とりあえず Angular v12 指定で、Angular のアプリケーションプロジェクトを作成する。
$ npx -p @angular/cli@12 ng new blog --routing --style=scss
$ cd blog/
次に、Angular のアプリケーションプロジェクトに Scully を追加する。
$ npx ng add @scullyio/init

> blog@0.0.0 ng
> ng "add" "@scullyio/init"

Node.js version v17.3.0 detected.
Odd numbered Node.js versions will not enter LTS status and should not be used for production. For more information, please see https://nodejs.org/en/about/releases/.
ℹ Using package manager: npm
✔ Found compatible package version: @scullyio/init@2.1.18.
✔ Package information loaded.

The package @scullyio/init@2.1.18 will be installed and executed.
Would you like to proceed? Yes
✔ Package successfully installed.
? Which route renderer would you like to use? Puppeteer
    Installing ng-lib
    Installing puppeteer plugin
UPDATE src/app/app.module.ts (466 bytes)
UPDATE src/polyfills.ts (3013 bytes)
UPDATE .gitignore (694 bytes)
UPDATE package.json (1228 bytes)
✔ Packages installed successfully.
CREATE scully.blog.config.ts (380 bytes)
UPDATE package.json (1302 bytes)
CREATE scully/tsconfig.json (450 bytes)
CREATE scully/plugins/plugin.ts (305 bytes)
以下のような設定ファイルが生成されていた。
この設定ファイルの routes プロパティへルートを定義していくと、各ルートのページを静的ファイルにしてくれるっぽい。
scully.blog.config.tsimport { ScullyConfig } from '@scullyio/scully'; /** this loads the default render plugin, remove when switching to something else. */ import '@scullyio/scully-plugin-puppeteer' export const config: ScullyConfig = { projectRoot: "./src", projectName: "blog", // add spsModulePath when using de Scully Platform Server, outDir: './dist/static', routes: { } };
単純なルートの追加
とりあえず、Angular CLI によって生成されるいつものサンプルページ (ルートページ) があるので、Scully で静的ファイルにしてみたい。
以下のように、 scully.blog.config.ts の routes へ追加する。
scully.blog.config.ts... routes: { '/': { type: 'default', }, }, ...
サイトのビルド
まず、 Angular アプリケーションを通常どおりに dist/ 配下へビルドする。
$ npm run build
さらに Scully で静的ファイルをビルドする。
$ npm run scully
これで、 dist/static/ ディレクトリが生成され、 index.html が生成される。
また、 $ npm run scully の代わりに、 $ npm run scully:serve を使うと、 http://localhost:1668/ で実際に閲覧することもできる。
ブログの構築
どうせなのでブログ形式にしてみる。 https://scully.io/docs/learn/create-a-blog/add-blog-support/
以下のコマンドを実行すると、Scully をブログ形式で使えるように、適切な設定が行われる
$ npx ng generate @scullyio/init:blog
まず、blog/ ディレクトリ配下に、以下のような記事ファイルが生成されていた。
とりあえず、published を true に書き換えた。
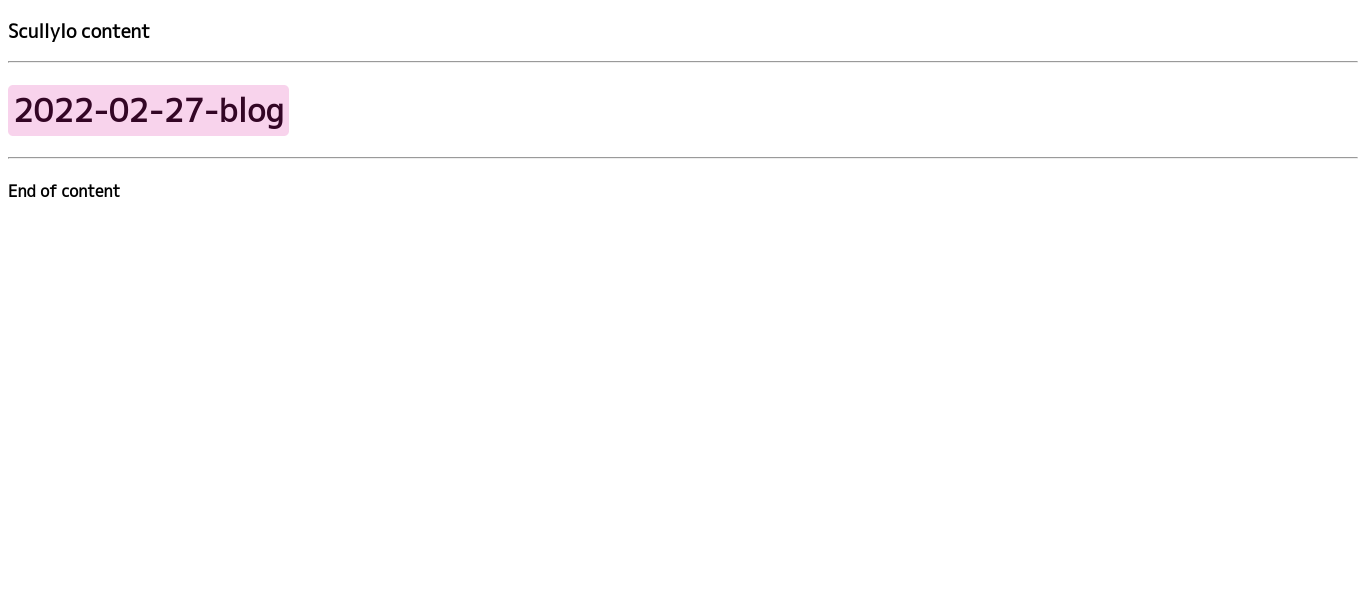
2022-02-27-blog.md--- title: 2022-02-27-blog description: blog description published: true --- # 2022-02-27-blog
次に、Scully の設定ファイルは、routes が以下のように書き換わっていた。
つまり、blog/ ディレクトリ配下のファイルに応じて、各ページ (/blog/XXXX) の静的ファイルを生成していくらしい。
scully.blog.config.ts... routes: { '/blog/:slug': { type: 'contentFolder', slug: { folder: "./blog" } },}, ...
さらに、Angular アプリケーションのソースコードとして、 BlogModule や BlogComponent というものができていた。 この BlogComponent に記事ファイルの内容が注入されるようだ。もしブログのデザインを変えたり、機能を追加したりしたいなら、 この BlogComponent を編集すれば良いのだろう。
blog.component.html<h3>ScullyIo content</h3> <hr> <!-- This is where Scully will inject the static HTML --> <scully-content></scully-content> <hr> <h4>End of content</h4>
次はビルドと行きたいところだが、app.component.html が Angular アプリケーションのサンプルのままになっているので、以下のように書き換えた。
src/app/app.component.html<router-outlet></router-outlet>
さて、サイトのビルドを実行してみる。このとき、scully コマンドに引数 --scanRoutes をつけることで、新しいページを発見してくれるらしい。
$ npm run build
$ npm run scully -- --scanRoutes
※ NOTE: 本当は上記のコマンドで良いはずだが、今回の環境では、中間の -- をつけても外しても、引数の --scanRoutes が渡されない問題が発生した。代わりに、 $ npx scully --scanRoutes でひとまず解決した。
すると、 dist/static/blog/ ディレクトリ配下に静的ファイルが生成される。
また、$ npm run scully:serve コマンドでサーバを起動して、 http://localhost:1668/blog/XXXX-XX-XX-blog を閲覧すると、記事が表示される。
これでブログ記事は生成されるようになったが、このままでは、一覧が存在しないので、次章でトップページを実装する。
ブログっぽいトップページの作成
まず、HomeModule と HomeComponent を実装していく。
$ npx ng generate module home --route=home --module=app-routing
これで src/app/home/ 配下に HomeModule や HomeComponent が生成される。
さて、このままでは HomeComponent が /home というURLになってしまっているので、 / で 表示されるように、以下のように path を書き換える。
src/app-routing.module.tsimport { NgModule } from '@angular/core'; import { RouterModule, Routes } from '@angular/router'; const routes: Routes = [ { path: 'blog', loadChildren: () => import('./blog/blog.module').then((m) => m.BlogModule), }, { path: '', loadChildren: () => import('./home/home.module').then((m) => m.HomeModule), }, ]; @NgModule({ imports: [RouterModule.forRoot(routes)], exports: [RouterModule], }) export class AppRoutingModule {}
次に、HomeComponent へ記事一覧を実装していく。
具体的には、 ScullyRoutesService を使ってページのリストを取得し、リストを表示する。
(参考: https://scully.io/docs/learn/create-a-blog/use-blog-post-data-in-template/ScullyRoutesService)
src/app/home/home.component.tsimport { Component, OnInit } from '@angular/core'; import { ScullyRoute, ScullyRoutesService } from '@scullyio/ng-lib'; import { Observable } from 'rxjs'; @Component({ selector: 'app-home', templateUrl: './home.component.html', styleUrls: ['./home.component.scss'], }) export class HomeComponent implements OnInit { links$ = this.scully.available$; constructor(private scully: ScullyRoutesService) { this.links$.subscribe((links) => { console.log(links); }); } ngOnInit(): void {} }
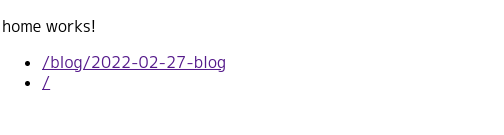
src/app/home/home.component.html<p>home works!</p> <ul> <li *ngFor="let page of links$ | async"> <a [href]="page.route">{{ page.route }}</a> </li> </ul>
そして、ビルド。
$ npm run build
$ npm run scully -- --scanRoutes
$ npm run scully:serve
これで、http://localhost:1668/ を開くと、以下のように記事一覧が表示された。
次回はページデザインを整えてから、 esa との連携とか、タグごとの記事一覧とについて書きたいとおもう。